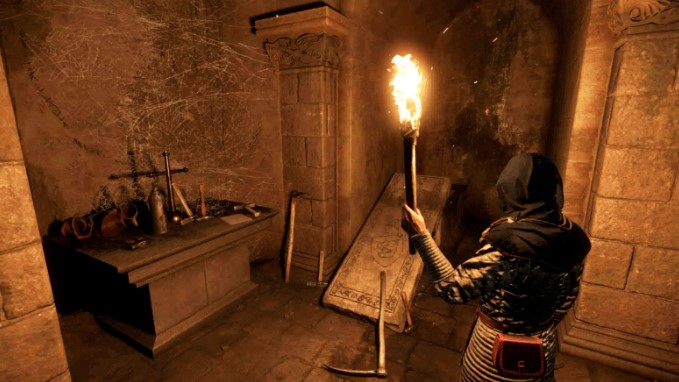
Arc Raiders is a new extraction shooter from Embark Studios, the team behind the competitive FPS The Finals. Unlike most games in the genre, Arc Raiders offers a more casual approach: the inventory has been significantly redesigned and simplified, the overall gameplay loop is uncluttered, and you don’t have to spend a ton of time preparing for a raid. Your opponents are ARC robots—AI enemies capable of adapting, flanking, and actively hunting down any player. You can also be attacked by other raiders, who are out to plunder.
To earn trophies, you need to interact with almost all currently available game mechanics: max out your character’s level, fully upgrade most workshop stations, and perform various actions during missions. You can play solo or in a team; only one trophy requires playing with a team (reviving your teammates 10 times). All other achievements can be easily earned solo—in fact, many players actually prefer this approach, as the game often pairs friends with each other during matchmaking.
There are currently three bugged trophies in the game. First, try to get the bronze “Who’s the Biggest?” (Shootout) trophy in your first match—you need to deal 1,000 damage to ARC vehicles. If you don’t achieve this in your first match, your progress will be broken and the trophy will become unavailable. It’s recommended to practice on a secondary account to get a feel for how best to achieve this requirement before attempting it on your primary account.
At the beginning of the game, your main goal is to get comfortable with the controls, master quests, and start upgrading workbenches in the Workshop. Completing quests for trophies is optional, but they provide a wealth of useful blueprints and consumables that will make the start significantly easier, without having to hunt for them yourself or craft them from scratch. Most one-time achievements can be completed right from the start—the key is to have access to the necessary items or points on the map.
When leveling up your skill tree , focus primarily on the “Survivability” branch. It’s the most useful overall due to the ability to craft items during a match and the “Security Breach” skill. It’s recommended to invest all your credits into increasing your stash size to the maximum of 280 slots as early as possible. This will give you much more freedom in crafting , storing items, and preparing for raids.

Once you’ve gotten the hang of things, your main goals are to upgrade your workbenches to level 3, reach level 75, and prepare for the battle against the Queen. Be sure to track the resources needed for upgrades so they count in matches, and pick them up whenever possible. Completing the “Expedition” project isn’t required for trophies, but if you choose to do so, don’t complete the “Dispatch” stage until you reach level 75—your level will reset after you depart. The most difficult trophy in the game is defeating the Queen, so prepare for this fight at maximum level and with the best gear.
Tips for getting achievements
Most of the skills in the tree aren’t particularly useful, and reaching level 75 only nets 76 points, so it’s best to invest in the “Survivalism” skill tree. Unlock the ability to craft important items like bandages directly on the map as early as possible—this significantly increases your chances of survival , especially if you’re out of first aid kits and aren’t sure you’ll be able to return to Speranza without healing. Afterward, continue developing the “Survivalism” skill tree to unlock the “Security Breach” skill. This allows you to hack unique, protected cabinets and find rare items inside.
In the Mobility tree, it makes sense to invest 5 points each in Marathon Runner and Deep Breathing, and distribute the rest between Endurance and Survivability.
Don’t forget to collect resources from Plyushkin the Rooster in the workshop between raids and keep an eye on the materials for his upgrades. He constantly produces basic resources, which helps you quickly recover after an unsuccessful raid. If Plyushkin requires fruit, it’s best to obtain them during the “Lush Vegetation” events that periodically appear on the maps.
If you want to complete merchant quests but don’t want to risk valuable items, use the “Free Gear” option after selecting a map. You’ll receive a random weapon and basic consumables without using any of your supplies. Many quests only require completing objectives without mandatory extraction—these quests are easier to complete with free gear, simply running to the objective, completing the task, and surrendering through the menu. However, be careful with quests that require you to retrieve specific items—if you fail, you lose them and will have to search for them again.
When specifically searching for resources for items or workshop upgrades, track them in the “Workshop” menu. They will then be highlighted as you mine them. We strongly recommend prioritizing workbench upgrades and collecting materials for their upgrades.

If you complete a run using free gear, you can then exchange your free gear booster at the Clinic vendor for one of the uncommon (green) boosters completely free. This is a great way to recover from losses: play a match with free gear, exchange it for an uncommon booster, and start with better gear.
Use chat during matches. In solo mode, most players are less aggressive if you announce your presence with your voice in advance—this often leads to calm encounters or even mutual support. However, if players completely ignore your voice or emote, don’t let your guard down. In team matches, players almost always shoot without warning, so be much more prepared for combat than in solo mode.
Mistakes in names or what’s wrong with the achievements?
If you’ve noticed that the achievements section in Arc Raiders is a complete mess—the descriptions don’t match the titles, the objectives for one achievement are listed for another, and a simple raid exit somehow counts as reaching level 75—then you’ve encountered a well-known Russian localization bug. The problem is that the Russian names and descriptions of the achievements have been somehow swapped , making it difficult to tell what you’ve already unlocked and what remains to be accomplished. Progress becomes random, and navigating the list is nearly impossible.
If you have any achievements left to complete and you’re unsure what exactly counts as uncompleted, use the achievement’s name as a guide, but also check its actual requirement, as the Russian text doesn’t reflect the actual task. And if you’re simply curious about why you earned a particular achievement, search for it by name and check the actual requirement—this is the only way to understand what the game actually counts as a result.
Big win
- The actual name of the achievement is “Rite of Passage”.
- Unlock requirements: Successfully return to Speranza for the first time.
- Tips for getting the achievement: It’s as simple as it gets—go on any mission, avoid death, and escape via the cargo elevator or any extraction point. You can also use the raider hatch. The achievement itself is awarded for completing the first mission normally.
Who is bigger?
- The actual name of the achievement is “Shootout”.
- Unlock Requirements: Deal 1000 damage to ARC robots .
- Tips for getting this achievement: To complete it, simply defeat several groups of ARC vehicles. Several destroyed robots will easily accumulate the required amount of damage, so the trophy can be earned in just one standard run. The key is to take your time with the extraction.

Gotcha
- The actual name of the achievement is “Technical Problems”.
- Unlock requirements: Shoot the Wasp’s engine.
- Tips for getting this achievement: As soon as you spot the Wasp, aim for its fans—hitting these components instantly earns the achievement. The mechanics are straightforward: shoot the engine and you’ll earn the achievement.
We don’t stand still
- The actual name of the achievement is “Self-sufficiency”.
- Unlock requirements: Place the workbench in your workshop.
- Tips for getting this achievement: Simply accumulate a small amount of resources and build any basic workbench in the Workshop. This process takes a couple of minutes and doesn’t require any special preparation.
Urine
- The actual name of the achievement is “First Step”.
- Unlock requirements: Knock out a raider.
- Tips for getting this achievement: Any finishing move will work here: use a tool, a normal interaction, or even an explosive. The key is to knock the enemy out cold.
Close contacts
- The actual name of the achievement is “New Friends”.
- Unlock requirements: Return to Speranza with the stranger.
- Tips for getting this achievement: Establish voice contact with other solo players—it’s enough to let them know you’re not aggressive. Most players are cooperative these days. Agree to travel together and leave the raid through the same exit. This is especially true for the first three maps, especially the Dam Battlefield and the Buried City. There are significantly more marauders in the Cosmodrome and especially at the Blue Gate.
Collector
- Real name of the achievement: no different.
- Unlock Requirements: Search 50 loot boxes.
- Tips for getting this achievement: open any containers you find on the map. After a few hours of play, you’ll accumulate the required number automatically—they’re found in literally every house and hidden corner.

The Legend of Speranza
- The actual name of the achievement is “Good Gear”.
- Unlock Requirements: Use two weapons of Rank II or higher during a Sortie.
- Tips for getting this achievement: bring at least two green-quality or higher guns with you on a raid and fire at least a couple of shots from each. This is enough—the trophy is awarded immediately after use.
Stepping on the same rake
- The actual name of the achievement is “No Longer a Newbie”.
- Unlock requirements: Reach level 10.
- Tips for getting this achievement: just play. You gain experience for everything—destroying ARC vehicles, searching containers, and collecting loot. You even get experience for searching empty containers that someone else has already opened and looted. If you’re running with a friend, be sure to search all the crates, even if they’ve already done so—it speeds up progress.
Master gunsmith
- The actual name of the achievement is “Behind Closed Doors”.
- Unlock Requirements: Get into the locked room in the Dam Battlefield, Buried City, or Spaceport.
- Tips for getting this achievement: Obtain a key to any locked area and open the door. Sometimes, even entering a room already unlocked by other players will count toward the achievement. If necessary, the location of locked rooms can be easily found on the interactive map or in the key descriptions.
Body kits
- The actual name of the achievement is “Not Over Yet”.
- Unlock Requirements: Successfully return to Speranza while incapacitated.
- Tips for getting this achievement: you need to get knocked down before extraction. The fastest way is to take damage from grenades, robots, or ask friendly players to “wound” you. Then, simply crawl to the extraction point and exit the area before you bleed out.
The Path of Extermination
- The actual name of the achievement is: “Who has more?”
- Unlock requirements: Destroy 50 ARC vehicles.
- Tips for getting this achievement: This is obtained naturally as you progress through the game. Any robot destroyed counts towards the achievement. Attack Wasps, spherical drones (Bombbots and Fireballs), and so on.

Today you, tomorrow me
- The actual name of the achievement is “We will never meet again.”
- Unlock Requirements: Successfully return to Speranza after abandoning a teammate.
- Tips for getting this achievement: You’ll need an ally for this one. Simply leave the raid alone, leaving your partner behind. If you’re playing with randoms through the matchmaking menu, you can sneak back to the extraction point, although this approach often causes frustration among other players.
Multi-move
- The real name of the achievement is: “How to sink into water.”
- Unlock Requirements: Successfully return to Speranza via the Raider Hatch .
- Tips for getting this achievement: To use the hatch, you need a key. The easiest way is to complete the story missions: several quests will allow you to acquire these keys.
At the last moment
- The actual name of the achievement is “We don’t stand still.”
- Unlock Requirements: Upgrade the Workbench to level 2.
- Tips for getting this achievement: After installing the basic workbench, simply gather additional materials and upgrade. The process is quick—it only requires a few resources and a few forays.
Blind shot
- The actual name of the achievement is “Body Kits”.
- Unlock requirements: Install 4 modifications on one weapon.
- Tips for getting this achievement: Find or craft a gun with four mod slots . Then collect a full set of mods and equip them all at once. Sometimes you can obtain a weapon with four mods simply by looting it from another raider.
Back to the Light
- The actual name of the achievement is “Master Gunsmith”.
- Unlock Requirements: Upgrade a weapon to Rank IV.
- Tips for getting this achievement: Any weapon can be upgraded to rank IV. This is done at a weapons workbench. The most cost-effective option is to upgrade tier I guns: the Ferro, the Ratchet, the Kettle, or the Stitcher. More details about weapons can be found in a separate guide .
Death from the Sky
- The actual name of the achievement is “Path of Extermination”.
- Unlock requirements: Destroy 100 ARC vehicles.
- Tips for getting this achievement: The mechanics are exactly the same as the “Who’s the Biggest?” achievement—just keep destroying robots at a natural pace, and the counter will reach 100.

Technical problems
- The actual name of the achievement is “No Mercy”.
- Unlock requirements: Knock out 10 raiders.
- Tips for getting this achievement: Same as the previously described achievement, but you need to repeat it 10 times. It’s much easier to complete when playing in a group: your teammates can help you find a suitable victim.
No mercy
- The actual name of the achievement is: “This is not forgiven.”
- Unlock Requirements: Take enough damage at the return point to earn a KO and incapacitate.
- Tips for getting this achievement: It’s best to complete this with free gear to avoid worrying about losses. Call the evacuation elevator, enter, and die in any way you can: from enemies, your own grenade, or from other players. The key is to completely “lie down” within the evacuation zone.
Escape Artist
- The real name of the achievement is “Big Jackpot”.
- Unlock Requirements: Return to Speranza with 50,000 worth of loot.
- Tips for getting this achievement: Collect rare items or expensive jewelry until your inventory value reaches the required threshold. You can also simply fill your backpack with 50,000 worth of your own gear, go on a raid, and head straight to the extraction point. However, this is risky.
Tangentially
- The real name of the achievement is “No Turning Back”.
- Unlock requirements: Remain on the Surface when the safe passages close.
- Tips for getting this achievement: simply wait for the timer to run out without extracting from the location. Often, the achievement will be awarded even if you request extraction in the final seconds and then finish the match after the timer runs out. That is, before the timer runs out, at the last extraction point, you request a cargo elevator. It arrives. When the timer runs out and the ARC falls on the location, you may even have time to extract.
A familiar route
- Real name of the achievement: no different.
- Unlock Requirements: Successfully return from the Dam Battlefield, the Buried City, and the Spaceport.
- Tips for getting this achievement: You only need to survive one of the listed locations. If you want, you can do it as quickly as possible. Head out on a mission and immediately head to the nearest extraction point. No shootouts, no loot scavenging, and so on.
Good equipment
- The actual name of the achievement is “Multi-Move”
- Unlock Requirements: Bring 1,000,000 worth of loot across all Expeditions.
- Tips for getting this achievement: Favorite grind… Follow the routes with the most valuable loot, as recommended by experienced players: this way, you can collect tens of thousands of coins in a couple of raids, significantly speeding up your progress.

How to sink into water
- The actual name of the achievement is: “Snitches get their mouths sewn shut.”
- Unlock Requirements: Destroy the Snitch using the Stitcher.
- Tips for getting this achievement: It’s simple—equip the Stitcher, wait for the Snitcher to get close enough, and shoot at its engines. If you hit it right, it’ll quickly fall apart, and you’ll earn the achievement.
The bigger the cabinet, the louder it falls.
- Real name of the achievement: no different.
- Unlock requirements: Destroy the Rocketeer.
- Achievement tips: This enemy may seem challenging at first, but once you get used to its attacks, you’ll realize it’s quite predictable. The key is to avoid going out into the open, where it can easily bombard you with its missiles . Equip the Anvil, take cover in a building with wide windows, and knock out its turbines, retreating when it takes aim. If you’re feeling adventurous, you can also use a couple of Wolf Pack Grenades—they’ll take down a significant portion of any ARC vehicle’s health.
In the name of science!
- The actual name of the achievement is “Top of the World”.
- Unlock Requirements: Reach the top of the Launch Tower in the Spaceport
- Tips for getting this achievement: head to the “Spaceport” map and immediately scan the horizon from the spawn point—you’re looking for the tallest tower. Ziplines line the sides of it, which Raiders can use to ascend to the top. Reach the roof—the achievement is yours.
This is not forgiven.
- The real name of the achievement is “Moch”.
- Unlock Requirements: Disable an encountered raider with a grenade.
- Tips for getting this achievement: If you have trouble handling grenades and throwing them accurately and precisely, you can negotiate with your teammates. However, in real combat, it’s better to throw trigger grenades in tight spaces—they deal maximum damage and have a high chance of knocking out the target. You can plant mines in passageways, but this approach is not widely recommended. In general, I easily disabled enemies with the explosive grenade (with the “skull” icon), which literally sticks to the target.
Everybody to training
- The actual name of the achievement is “At the last moment”.
- Unlock Requirements: Successfully return to Speranza with less than 5 seconds left in the round.
- Tips for getting this achievement: Approach the exit early, call the elevator about a minute and a half before the general timer expires, and wait. When the timer reaches about 8 seconds, initiate the evacuation using the remote control. The achievement is yours!
Kind soul
- The actual name of the achievement is “Everyone, Get to Training.”
- Unlock requirements: Visit the Training Grounds.
- Tips for getting this achievement: Just play until the training area opens. It’s a completely safe location where you can test your weapons. Visit it at least once, and the achievement is yours. You can also grab four different guns to earn the “Comparative Analysis” achievement.
It’s not over yet
- The real name of the achievement is: “Stepping Over the Same Rake.”
- Unlock Requirements: Trigger two car alarms in one round.
- Tips for getting this achievement: wander around the location and look for cars with illuminated headlights—they still have battery power left, so they’ll make a loud noise when you get close. Just run past two such cars in a single match to earn the achievement.

Master craftsman
- The actual name of the achievement is “Back to the Light”
- Unlock Requirements: Revive a teammate 10 times.
- Tips for getting this achievement: It’s simple—revive your teammates after they’ve been knocked out until the counter reaches ten. If you don’t have regular teammates, you can ask a random player to intentionally fall from a height or get in the way of ARC vehicles—that way, you’ll complete the achievement in just one run.
There is no turning back
- The actual name of the achievement is “Blind Shot”.
- Unlock Requirements: Hit a target from over 250 meters away.
- Tips for getting this achievement: ARC vehicles are also suitable. Equip a long-range weapon, estimate the distance using a ping (place a marker), and try to fire at least one shot at the enemy. A rifle is the most convenient, but the achievement can even be earned with a “Teapot.”
Towards a breakthrough
- Real name of the achievement: no different.
- Unlock requirements: Destroy Bastion.
- Tips for getting this achievement: the fastest way is with a couple of Wolf Pack grenades, which will take out almost all of his health. If you want to be more careful, aim for his paws or the battery on his back. You can have a teammate stand on the opposite side to force Bastion to turn his back on you. More precisely, he’ll turn his back either to you or to your teammate. It’s that simple!
The enemy of my enemy
- The real name of the achievement is “Kind Soul”.
- Unlock requirements: Earn 10 commendations for your actions.
- Tips for getting this achievement: share resources, heal allies, revive them after a knockout—any helpful action can earn you a player’s gratitude. The key is for the player to press G after assisting. Repeat this ten times, and you’re done!
The first step
- The actual name of the achievement is “Close Encounters”.
- Unlock Requirements: Knock out a Raider with the Raider Tool.
- Tips for getting this achievement: When the enemy is already on the ground, simply finish them off with the Raider’s Tool. It’s important that they don’t have time to surrender. It’s best to complete this in a squad—their teammates will help you find the right victim.
Informers have their mouths sewn shut
- The actual name of the achievement is “Comparative Analysis”.
- Unlock Requirements: Use 4 different weapons to deal damage in the Training Grounds
- Tips for getting the achievement: equip four different guns, add them to your inventory, and head to the firing range. Deal damage with each weapon using any method—even shooting cans and mannequins will do. After firing the last weapon, the achievement will unlock automatically.
Top of the World
- The real name of the achievement is: “Today you, tomorrow me.”
- Unlock requirements: Revive an oncoming raider with a defibrillator.
- Tips for getting this achievement: Get a defibrillator—buy it from Lance, craft it, or find it during a run. Then, find a downed player (or knock them out yourself), approach them, equip the defibrillator via the quick slot, and hold LMB. The key is to avoid misplacing the button and finishing the poor guy off. After a successful revive, the target will usually thank you.

Behind closed doors
- The actual name of the achievement is “Escape Artist”.
- Unlock requirements: Successfully return to Speranza 100 times.
- Tips for getting this achievement: the goal is simple: evacuate from a hundred different rinks. The game doesn’t pause, so the process can take a very long time. You’ll get it naturally, but not as quickly as you’d like.
Rite of passage
- The real name of the achievement is: “Three birds, one stone.”
- Unlock Requirements: Destroy three ARCs with a single Wolf Pack Grenade.
- Tips for getting this achievement: Find a dense group of wasps or hornets. You can lure them in with the Snitch. When they’re all grouped together, cast Wolf Pack. The explosion will cover several drones at once, and you’re practically guaranteed a triple kill.
We will not meet again
- The actual name of the achievement is “The Toughest Pants in Speranza”.
- Unlock requirements: Make a sliding tackle 80 meters without stopping.
- Tips for getting the achievement: Leveling up the skill isn’t necessary—the key is finding a long slope. There’s a great slope near the dam on the Battlefield: slide from the very top and roll until you stop. The achievement usually counts before you reach the finish line, but sometimes it takes a few tries.
No longer a newbie
- The actual name of the achievement is “Master Craftsman”.
- Unlock Requirements: Upgrade 5 workbenches to level 3 or higher.
- Tips for getting this achievement: accumulate resources for upgrades and upgrade various workbenches to level 3. Progress is measured by the number of fully upgraded stations, so simply upgrade each one to the required level.
From ambush
- Real name of the achievement: no different.
- Unlock Requirements: Destroy a Sentry using the Raider Tool.
- Tips for getting this achievement: The Sentry often spawns near Buried City City Hall and near buildings on the Dam Battlefield. Damage it until it starts smoking. Then throw smoke grenades, get as close as possible, and finish it off with the raider’s tool. The key is to finish it off before the turret recovers.
The most durable pants in Speranza
- The actual name of the achievement is “Tangentially”.
- Unlock Requirements: Get hit by a dropped supply crate.
- Tips for getting this achievement: Request a supply capsule from the station . As soon as the parachute appears in the sky, run to the approximate impact point. The crate falls exactly where the yellow flare rose, making it easy to navigate. Your goal is to position yourself directly under the capsule and absorb the impact. This will take several attempts.
Three birds, one stone
- The actual name of the achievement is “Death from Above”
- Unlock Requirements: Deal 50 damage to any enemy while equipped with the Rocketeer.
- Tips for getting this achievement: The best way to get the Rocketeer is to ambush him on high ground and jump on him from above. Another way is to disable him with EMP stun grenades, approach him while he’s on the ground, and jump on him. Afterwards, deal some damage with any weapon—damage to the Rocketeer himself counts.
Shootout
- The real name of the achievement is: “In the name of science.”
- Unlock Requirements: Get Gassed, Stunned, and Burned at the same time.
- Tips for getting this achievement: This situation is rare, so it’s easier to assemble a full set yourself: mines, traps, and various types of grenades. Place everything in one place, detonate it with a grenade, and enter the trap simultaneously. This doesn’t work in the training grounds—the achievement is only awarded in a real-life encounter.

Self-sufficiency
- The actual name of the achievement is “The Legend of Speranza”.
- Unlock Requirements: Reach level 75.
- Tips for getting this achievement: you’ll have to farm for a long time. Boss fights help speed up the progress —they reward large chunks of experience, sometimes earning up to 40,000 for a successful run. So the best way is to hunt big targets.
Legendary story
- Real name of the achievement: no different.
- Unlock Requirements: Destroy the Queen
- Tips for getting this achievement: You’ll face a challenging, grueling battle. Regular drones will get in the way, and the Queen herself is, to put it mildly, no match for you . The optimal loadout for solo play is “Huskbreaker” and plenty of “Wolf Pack” grenades. However, it’s best to play in a group: together, the risk of losing loot in the first few minutes is much lower.
Comparative analysis
- The actual name of the achievement is “Gotcha”.
- Unlock Requirements: Use a Decoy Grenade to make one drone attack another ARC vehicle.
- Tips for getting this achievement: take bait, find a group of Wasps or Hornets, and throw a grenade at one of the drones. You need to make sure the drone attacks its own ally.
New friends
- The actual name of the achievement is “The Enemy of My Enemy”
- Unlock Requirements: Disable an encountered Raider using an ARC vehicle summoned by the Snitcher.
- Tips for getting the achievement: The easiest way is to negotiate with another player beforehand. Throw the Snitch Driver, the ARC vehicle attacks the raider, and the achievement is yours. If you’re playing solo, look for raiders in open areas, throw the Driver directly at them, remove their shields, and reduce their health so the ARC vehicle can deal fatal damage.